Verify API
Verify physical authenticity and uniqueness
Our Verify API gives your application or service the ability to verify not only the uniqueness and authenticity of physical components and products containing VivoKey secure microchips, but also the unique tap or scan event as a moment in time. Using strong standards based cryptographic proofs over NFC (contactless near field communication).
API interface and keys
The VivoKey Verify API is designed to be open and extremely easy to use. The Content-Type must be application/json and the JSON object data must be posted as raw data, not form encoded data, or your posted data will not be processed.
Interface URL, http headers, etc.
Base URL: https://auth.vivokey.com
Content-Type: application/json
Method: HTTP POST
*X header: X-API-VIVOKEY
*Only /validate and /verify endpoints require this header value to validate signatures and encrypted JWEs (respectively)
API Security
The Verify API utilizes a developer ID that is tied to your email address. One or more API keys can be issued to your developer ID. The developer ID is effectively public, while API keys for each developer account should be considered private and kept secret. Obtain a developer ID by requesting an API key to your email address (see Get API Key below)
Developer ID
- GUID issued to a unique developer email
- Considered public
- Included in JWT claims / JSON data
- For use in mobile apps and public interfaces
- Can have one or more API keys associated
- JWT "sub" claims salted with dev ID for privacy
API Key
- GUID issued to a unique developer account
- Considered secret
- Can be easily revoked / rotated
- Multiple API keys can be active per developer
- Not to use used in mobile apps or public interfaces
- JWT "sub" claims identical across all API keys per developer ID
Get an API key
Getting your first Verify API key is as simple as submitting your email address. The email address you use will be the basis for your developer account ID, and any API keys sent to this email address will all be registered to the same developer account ID. This becomes important when considering multiple applications which may use a Verify API key. The Developer ID is also included as a claim in the authenticity JWT returned by this API upon successful verification.
When you receive your API key, your developer ID will also be included in the email. The developer ID is considered public and can be used in mobile applications when interacting with the Verify API. Your API keys should be kept private, and only used by your backend or web servers in server-to-server communication with our API.
Error codes
API error or failure modes are rather simple;
- HTTP error code 400 (Bad Request) will be returned if there are syntactical problems with the data submitted.
- HTTP error code 401 (Unauthorized) will be returned if you forget to include the X-API-VIVOKEY header or provide an invalid API key.
- HTTP error code 406 (Not acceptable) will be returned from /session if there is a problem verifying authenticity of the chip
- HTTP error code 418 (I'm a teapot) will be returned if requests to /session use expired tokens.
Two ways to verify
Depending on the product type, VivoKey offers two ways to verify authenticity and uniqueness. The easiest type of check is a signature verification, and the other more secure and thorough type of check is a challenge verification.
Signature verification
Pros:
- Very easy to use
- No mobile app required, just tap
- Minimal web server side code
Cons:
- Not as secure as challenge / response
- No guarantee of scan time, only uniqueness
- Not appropriate for high security applications
Challenge verification
Pros:
- Very secure tap verification
- Verified tap event time / date
- Appropriate for high security applications
Cons:
- More complex than signature verification
- Requires mobile app on phones
- Multiple API calls required for complete verification
Signature verification
Signature verification is a simple way for web based applications to verify that a website visitor has arrived at your URL by scanning an authentic VivoKey NFC chip with their phone. Doing so requires no special applications on the phone, the user just taps and a browser opens to your URL with a unique signature embedded in the URL, which your web server verifies as authentic and unique using our /validate API endpoint.
Signature verification is not supported by all VivoKey products. Here is a breakdown of support by product.
- Spark 1 - Does not support signatures
- Spark 2 - Supports signatures in read-only VivoKey URLs
- AuthentiChip - Secure JWT redirected to your customized URL.
- Licensed NFC - Custom Verify NFC chips programmed to your customized URL.
- Apex - NFC Sharing applet supports signatures in dynamically writable URLs.
Signature verification flow
Signature verification works by embedding dynamic signature data within the URL programmed into a supported VivoKey NFC chips. Users simply tap a VivoKey enabled product with their phone and the mobile browser will open the website URL programmed into the chip. This URL includes a dynamically generated signature value that the web server validates as unique and authentic by sending it to the Verify API /validate endpoint. If the signature is valid and the scan is unique, a signed authenticity JWT is issued. Alternatively, your web server may validate the signature and receive unsigned JSON back by calling /validate.json instead.

API endpoint for signature verification
The base URL for the Verify API is https://auth.vivokey.com and there are only one relevant endpoint for signature validation. In order to verify a unique signature generated for each tap, submit the URL data that includes the signature to the /validate API endpoint.
/validate
The /validate endpoint is used to verify signatures generated for each unique read of supported VivoKey chips and products. Reading the signature is easily done with any NFC enabled smartphone. No special app is needed, just scanning the product will open the signed URL on the phone's native web browser. The web server can then obtain the signature from the URL and send it to the /validate endpoint to verify uniqueness and authenticity.
Passing signature data to the /validate endpoint for authenticity checking requires specific HTTP headers. The X-API-VIVOKEY header must contain a valid API key, and Content-Type must be set to application/json or your post data will not be processed. Your API key should never be encoded in public facing interfaces or used is mobile applications which can easily be decompiled to reveal API keys and other secrets.
The /validate endpoint verifies the signature value, then returns a JSON object. If the signature is valid and not expired (already used), a token value is also returned containing a signed authenticity JWT. The atp claim value within the JWT will be cmac to indicate the type of verification used.
KVPs sent to /validate
| Key | Description |
|---|---|
|
signature |
The signature data from the VivoKey product. See below ⤷ for examples. |
|
aud |
[optional] Audience claim embedded into the resulting jwt. Typically the URL of the intended consumer. |
|
cld |
[optional] Client data claim. Arbitrary string data (up to 2048 characters). Embedded into resulting jwt. |
KVPs received from /validate
| Key | Description |
|---|---|
|
result |
The result of the signature check. Possible values are success, expired, and invalid. The response value success means that the signature is valid and current, as in this signature is the most recent CMAC or highest counter value the server has validated from this product to date. A result of expired means that the signature contains a counter value that is not as recent as what has already been validated by the server. A result of invalid means there is a problem with the signature. |
|
token |
[conditional] The token value contains a signed JWT called an authenticity token. The token payload contains important verified data which can be used by your application or service, as well as passed between services as necessary. Each service or application which receives the authenticity token can validate its signature to verify authenticity of the token and its contents without ever having to call an API. The token KVP will only be supplied if the result key value is success. |
Signature verification examples
Verify Spark 2 and VivoKey licensed products
The Spark 2 and licensed secure NFC products have a unique URL that contains a signature which updates each time the chip is tapped by an NFC phone or reader device. For example, the URL written to the Spark 2 begins with https://vivokey.co/ followed by a unique ID and then the signature. To verify the signature, submit the URL data (which includes the signature) to the /validate endpoint. For example, if you read the URL from the Spark 2 as https://vivokey.co/3c8d418757dcce5459f5b8576a5fb652/?sun=042468222F5C80-00003C-AE4F60A1AF728AB4 then you would submit the following to the /validate endpoint.
{“signature“: “042468222F5C80-00003C-AE4F60A1AF728AB4”}
{“result“: “success”,“token“: “eyJ0eXAiOiJKV1QiLCJhbGciOiJFUzI1NiIsImtpZCI6ImprM3JXNEhBVm9HSzl6QVhsdnVzdnMxdTFLeVlMRUxYRG10OXlTOXViYUkifQ.eyJ0eXBlIjoyLCJwcm9kdWN0IjoyLCJhdHAiOiJjbWFjIiwic3ViIjoiZDYwOGFhZGYwYjI1MmE4N2EwYmEyMGQ3NTQ1NDM1N2Y3Y2Y5NDZlNWZjM2VjMmQ4YjViZmY4NGRhODg4Yzk5ZSIsImlhdCI6MTY4Nzg0MjAzMSwiZXhwIjoxNjg3ODQyMDYxLCJpc3MiOiJodHRwczovL2F1dGgudml2b2tleS5jb20iLCJqdGkiOiI2ODY0NTdjMjBmNjZkOWU1YWI3ZWQyMzMxYmYyOGMyNWE0ZjI4NGQ0MTAyZWFjMmE2YTUxNjc0NjdmMTcxYTI2In0.guSNm14-Nwf7nniN2Am9efCZCyW86ZXjC4F5Y08UzAVCqO4lbYTT5Wb6ip3g4Wf-OFCQNoe1G-E1NNZBlz-FeA”}
Get JSON from /validate.json
If dealing with signed JWTs is not necessary and you want unsigned JSON data from the Verify API, you can call /validate.json instead.
{“signature“: “042468222F5C80-00003C-AE4F60A1AF728AB4”}
{"dev_id":"aaa1c9d1-078d-45c3-adfe-4274ccee9043","atp":"cmac","sub":"953e0b350d98cb8bfef8a6ed1ad701246f38f8c5c74009fa99d1699f634eb6fa","cip":"68.183.62.100","iat":1759176839,"exp":1759176869,"iss":"https://auth.vivokey.com","jti":"1faa4183c2df51d2ae5edc933eccfb90980bca8430d721fbd8cb50551a0f1e66","type":3,"product":8,"result":"success"}
Expired signatures
If you send the same signature a subsequent time, which may occur if someone attempts to reload a webpage for example, it will return as expired. This means the signature is valid, but it is no longer considered unique.
CMAC Signatures with NFC Sharing for Apex
The NFC Sharing app for Apex may have (this feature is optional) the NFC Sharing applet installed, which supports signatures. The signature changes each time NFC data is read from the NFC Sharing applet. To verify the signature, submit the URL data which includes the signature data element to the /validate API endpoint. For example, if you program the NFC Sharing app with the following URL data;
https://vivokey.com/demo/sigtest/?s={AES128_CMAC_SIGNATURE_XXXXXXXXXXXXXXXXXXXXXXXXXXXXXXXX}
When scanning with a phone, a browser will open to the URL with the signature marker dynamically replaced with unique signature data;
https://vivokey.com/demo/sigtest/?s=FF0A01128731FBB6-000005-E92AB4B81AAA1FEAB2C4D2AF4665AD19
You would then submit the signature data to the /validate endpoint like this;
{“signature“: “testing.com/signature/?s=FF0A01128731FBB6-000005-E92AB4B81AAA1FEAB2C4D2AF4665AD19”}
Expired signatures
If you send the same signature a subsequent time, which may occur if someone attempts to reload a webpage for example, it will return as expired. This means the signature is valid, but it is no longer considered unique.
{"result":"expired"}
Live signature verification test
Using the form below you can test signature verification using your API key and signature data.
Security caveats of signature verification
Signature verification is convenient, but there are security issues you should be aware of before deciding if signature based verification is the right choice for your application.
Signature stockpiling for later use
Powered by the NFC field emitted from a phone or reader, VivoKey secure NFC microchips do not have a way to keep track of the current time and date. This means all unique signatures must be generated using an incremental counter method. This opens up the possibility that someone could perform a series of reads in rapid succession to stockpile a large number of valid unique signatures and use them at a later time with our Verify API. The actual risk to your application's security depends entirely on your how your application is designed.
Signatures use a counter value incremented within the NFC chip itself, which cannot be rolled back. The Verify API will always look for a counter value embedded in the signature that is higher than the last counter value that was validated by the server. If an attacker performs a series of reads to gain a collection of signatures, and someone performs a legitimate read where the signature is validated, then all previous stockpiled signatures will be immediately invalidated.
Example stockpile attack scenario
- An attacker reads 10 signatures with counter values 89103 to 89118, but does not open a web browser or verify the signatures. These signatures are stockpiled for future attacks.
- A legitimate user taps and receives signature 89119. As part of the normal tap process, a web browser is opened on the phone and the application verifies the signature with the Verify API.
- The Verify API verifies signature 89119 as valid and unique, and issues a secure signed JWT for this tap / scan event. Internally, the Verify API server has staked this specific secure NFC chip's counter at 89119.
- The attacker attempts to use signature 89103, but receives "expired", and critically, does not receive a secure signed JWT. This means all of the signatures which were stockpiled earlier are no longer able to be used to receive a signed JWT.
If your application requires secure verification, or requires the date and time of the chip tap (scan) event to be accurate, then use the challenge verification option. With challenge verification, the Verify API server generates a time stamped challenge which is integrated into the authenticity JWT issued for a verified legitimate tap or scan.
Challenge verification
The challenge verification process is a high security check which ensures the not only the authenticity of a VivoKey secure NFC chip, but also the time the phone tapped or scanned the VivoKey chip. Customers which require a highly secure authenticity verification should not use signature validation and instead integrate challenge verification into their mobile applications.
Challenge / response flow
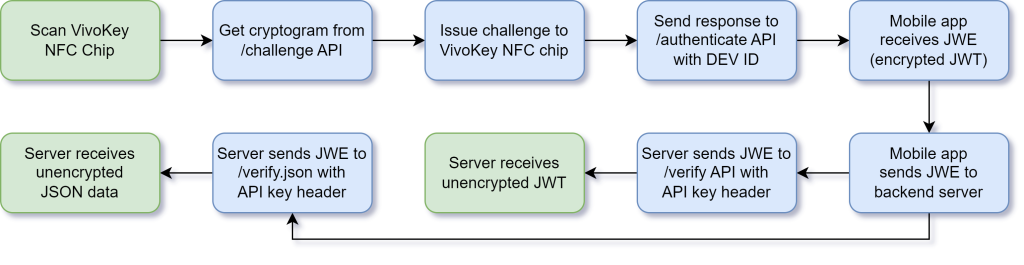
The challenge / response verification method is the most secure way to verify authenticity of the VivoKey chip as well as ensure the time of the tap or scan event is accurate. Once a VivoKey enabled product is tapped, a time stamped cryptographic challenge is obtained from the Verify API /challenge endpoint. That challenge is passed to the VivoKey product, and a secure cryptographic response is generated. This response is sent back to the /authenticate endpoint for an authenticity check. If verified, an encrypted JWT (called a JWE) is generated. The mobile application then passes this JWE to the relevant service backend.
Once your backend server receives the JWE from your mobile app, the server must verify the JWE to reveal the authenticity data. If you wish to process the authenticity data as a signed JWT, submit the JWE to the /verify endpoint. If you wish to process the authenticity data as plain unsigned JSON data, submit the JWE to the /verify.json endpoint. Remember to submit the JWE with a private API key in the X-API-VIVOKEY http header, or your request will not be processed.
API endpoints for challenge verification
The base URL for the Verify API is https://auth.vivokey.com and there are only two relevant endpoints for the challenge flow; challenge and session. These endpoints consume and return JSON objects. Remember to ensure your posts have the HTTP header Content-Type set to application/json or your post data will not be processed.
/challenge
This endpoint consumes a JSON object that contains one or more key-value pairs (KVP), depending on which chip type is being challenged. The endpoint will return a JSON object that contains a payload and token KVP. Challenges expire after 30 seconds.
KVPs sent to /challenge
| Key | Description |
|---|---|
|
scheme |
The scheme value can be 1 or 2. The scheme informs the challenge generator which type of VivoKey chip is being challenged. Scheme 1 requires no other KVPs, and generates a basic challenge for Spark 1 chips. Scheme 2 requires both uid and message KVPs, and generates a challenge for Spark 2 chips as well as Apex chips running the Spark app. |
|
uid |
[conditional] The UID is the unique identifier or serial number of the chip being challenged. Certain VivoKey chips have a 7 byte UID while others have an 8 byte UID. Value is represented in hexadecimal notation. The uid KVP is not required for scheme 1 challenges. |
|
message |
[conditional] For Spark 2 and Apex chips running the Spark app, the chip will generate a PCD challenge as part of the mutual authentication scheme used by the chip. This message is passed to the /challenge endpoint and an appropriate chip challenge is generated. Value is represented in hexadecimal notation. The message KVP is not required for scheme 1 challenges. |
KVPs received from /challenge
| Key | Description |
|---|---|
|
payload |
The payload value is the VivoKey authenticity challenge which must be passed to the chip for processing. |
|
token |
The token value is an encrypted JWT called a challenge token. The challenge token must be passed to /session along with the chip response for the associated payload to /session. Challenge tokens expire after 30 seconds. |
/authenticate
This endpoint consumes a JSON object that contains three KPVs. The endpoint will return a JSON object that contains a token KVP, the value of which is an encrypted authenticity JWT called a JWE. The purpose of this JWE is to carry all of the valuable validated authenticity information from your mobile application or public application interface to your secured service backend. Only your service backend with private API key will be able to decrypt the JWE to obtain the authenticity data, ensuring you can verify that a specific VivoKey chip scan was validated as authentic at a specific time, and has not been altered by any 3rd parties in transit.
KVPs sent to /authenticate
| Key | Description |
|---|---|
|
uid |
The UID is the unique identifier or serial number of the chip being challenged. Certain VivoKey chips have a 7 byte UID while others have an 8 byte UID. Value is represented in hexadecimal notation. |
|
response |
For Spark 1, the response is a basic challenge response. For Spark 2 and Apex chips running the Spark app, the chip will generate a mutually authenticated response. The value is represented in hexadecimal notation. |
|
token |
The challenge token obtained from /challenge is sent back to /session. |
|
cld |
[optional] You have the option of passing any properly json encoded arbitrary data along with the chip response to /authenticate (up to 2048 bytes). This data will be encoded into the authenticity token as a JWT claim called cld (client data). This allows you to embed application and user / client session relevant data to the chip scan event, making it part of the authenticity token. |
|
aud |
[optional] You have the option of passing audience data to be used as the audience claim. The aud (audience) claim identifies the recipients that a JWT is intended for. Each principal intended to process the JWT must identify itself with a value in the audience claim. If the principal processing the claim does not identify itself with a value in the aud claim when this claim is present, then the JWT must be rejected (ietf rfc7519). |
KVPs received back from /authenticate
| Key | Description |
|---|---|
|
token |
The token value contains an encrypted JWT called a JWE. The JWE payload contains all the important verified scan data which can be securely passed to your service backend. Your service backend will then use a private API key to decrypt the JWE payload using the /verify endpoint. |
/verify
This endpoint consumes a JSON object that contains a single KVP called token. Simply send the JWE received from /authenticate as the token key value. The endpoint also requires the use of the X-API-VIVOKEY http header with a private API key which is issued to the developer ID embedded in the JWE. Upon successful verification, the endpoint will return a JSON object that contains a token KVP, the value of which is a signed authenticity JWT. The purpose of a signed token is to encapsulate all of the valuable validated authenticity information inside itself, ensuring you can verify that a specific VivoKey chip scan was validated as authentic at a specific time, and has not been altered by any 3rd parties in transit. Authenticity tokens expire after 30 seconds and should not be used after it has expired (after exp). The endpoint is called session because the authenticity token is meant to be used to establish and maintain an authenticated session for VivoKey services, but you can also use it within your own services and applications.
KVPs sent to /verify
| Key | Description |
|---|---|
|
token |
The encrypted JWE received from /authenticate |
KVPs received back from /verify
| Key | Description |
|---|---|
|
token |
The token value contains a signed JWT called an authenticity token. The token payload contains important verified data which can be used by your application or service, as well as passed between services as necessary. Each service or application which receives the authenticity token can validate its signature to verify authenticity of the token and its contents without ever having to call an API. |
/verify.json
If you prefer to receive unsigned JSON data instead of a signed JWT from /verify, simply call /verify.json and the endpoint will verify your API key, decrypt the JWE, and send you back the payload as JSON. Be sure to include the X-API-VIVOKEY http header with one of your assigned developer API keys.
/session
The /session endpoint is depreciated and should not be used.
Challenge verification examples
Sending data to a passive RFID transponder (all NFC transponders are RFID transponders, but not all RFID transponders comply with NFC standards) is done using commands over a particular "air interface" for the product in question. VivoKey products communicate using 13.56MHz RFID standards ISO14443A and ISO15693, and comply with NFC standards for Type 4 and Type 5.
Exactly how you send commands to VivoKey products over NFC depends on the operating environment. For example, using Swift for iOS to submit a TAM1 challenge to a Spark 1 means you would use the authenticate command. On Android you would use NfcV and transcieve. If you are using PC/SC to communicate, Spark 2 speaks APDUs natively while the Spark 1 may need commands sent over PC/SC as the payload of a standard "transparent" APDU. Response data would also be suffixed with standard APDU status words (SW1, SW2) with values of 90 00 which means "command successfully executed".
Spark 1
The Spark 1 is an ISO15693 RFID transponder which complies with NFC Type 5 (NfcV for Android, NFCTagTypeISO15693 for iOS). If you are communicating with the Spark 1 over PC/SC using a CCID compliant reader, you may need to send ISO15693 commands using an APDU compliant command format or command wrapper. Check your reader's documentation.
For this example we will use a Spark 1 with an 8 byte UID of e0 04 01 18 00 9c 5d 52 (in MSB byte order). While not important for our API, it's useful to know the UID format of ISO15693 transponders is broken down into the following structure;
Byte 1: This is the Manufacturer code. It is assigned by the NFC Forum to each manufacturer. For example, Texas Instruments has the manufacturer code 0x01, NXP Semiconductors has 0x04, and so on.
Byte 2-3: These bytes represent the chip type. This is a unique code assigned by the manufacturer to each type of chip they produce.
Byte 4-8: These bytes represent the chip serial number. This is a unique number assigned by the manufacturer to each chip. It ensures that each chip produced by the manufacturer has a unique identifier.

STEP 1. Obtain a challenge from the /challenge endpoint
For Spark 1, send scheme value 1 to the API endpoint and receive a challenge payload and challenge token back.
{"scheme": 1}
{"payload":"3bc96bc85fa3405fe416","token":"eyJhbGciOiJkaXIiLCJlbmMiOiJBMjU2R0NNIn0..MhqTUKrdDjZSHSq9.EFn2Utl-hR1dTIwX_l9EREO4UPI6U2R1VtiFMcJfZUeSDiWBQCBan887f2cDKG0PRZWCwAL6gZim4dv02ruIyQZk3_OuMrMsmElEeDxkEzrOVOloLpiFL2wjug06fKcWXbhh5flImmRyuH5bbB_k8qWjD6HfDPiz8R0wFJ3gArx6-8sPbfLBF2UqIBIGBISMqerfz4nzsJY.f0f2S0RA5wGVUGfE2my8bg"}
STEP 2. Send authenticate command to Spark 1
The ISO15693 command represented in hexadecimal format below must be sent to the Spark 1 as an "addressed command", meaning you must include the UID of the transponder the command is intended for within the command structure itself, and the UID must be sent in LSB order. The challenge obtained from the server is appended to the end.
Command Code: 20 (authenticate)
Request Flag: 35
UID: 52 5d 9c 00 18 01 04 e0 (8 bytes of UID in LSB order)
CSI: 00 (AES)
RFU: 00
Key: 02
Challenge: 3b c9 6b c8 5f a3 40 5f e4 16
Complete command: 20 35 52 5d 9c 00 18 01 04 e0 00 00 02 3b c9 6b c8 5f a3 40 5f e4 16
How you send this command depends entirely on the operating environment. For example, using Swift for iOS means you use the authenticate command, which handles the command 20 and UID details for you. On Android you would use NfcV and transcieve. You should receive 12 bytes of data back which is the encrypted response data for the challenge you sent to the chip. If you are using PC/SC to communicate with the Spark 1, this data may be suffixed with APDU status words (SW1, SW2) with a success value of 90 00.
STEP 3. Submit the TAM1 response to the /session endpoint
{"uid":"e0040118009c5d52","response":"8d77260aea0fb3a68dc158aabbecb7a3","token":"eyJhbGciOiJkaXIiLCJlbmMiOiJBMjU2R0NNIn0..MhqTUKrdDjZSHSq9.EFn2Utl-hR1dTIwX_l9EREO4UPI6U2R1VtiFMcJfZUeSDiWBQCBan887f2cDKG0PRZWCwAL6gZim4dv02ruIyQZk3_OuMrMsmElEeDxkEzrOVOloLpiFL2wjug06fKcWXbhh5flImmRyuH5bbB_k8qWjD6HfDPiz8R0wFJ3gArx6-8sPbfLBF2UqIBIGBISMqerfz4nzsJY.f0f2S0RA5wGVUGfE2my8bg"}
{"token":"eyJ0eXAiOiJKV1QiLCJhbGciOiJFUzI1NiIsImtpZCI6ImprM3JXNEhBVm9HSzl6QVhsdnVzdnMxdTFLeVlMRUxYRG10OXlTOXViYUkifQ.eyJ0eXBlIjoxLCJwcm9kdWN0IjozLCJhdHAiOiJ0YW0iLCJzdWIiOiJlOGU5OGQ0MTVmM2I5NzI2MTE1ZjRiYjQ1NTNkZThmYTgxZTM3MjY5ZDUxMDkxNDgzMzUxMDYyMTMwOGFjN2IwIiwiaWF0IjoxNjg4NTgyNjkxLCJleHAiOjE2ODg1ODI3MjEsImlzcyI6Imh0dHBzOi8vYXV0aC52aXZva2V5LmNvbSIsImp0aSI6ImIzMTM5NmRmYzA0MGJjZmRmOTI4MGYwY2JlZDVjMWE2Zjk2NDUzZmZlM2VlMDljNWU0NTNmM2JkODIwMjM0ZjkifQ.Ep6PL6ySPagUHVeq-DSmASmui2VwJhaBk9ifSpIqTMQ_mlGrrAVxnCApjSC9jqQV2h5YGCISNpQN8ELWh0-YtQ"}
• Inspect authenticity JWT with jwt.io (includes public key to validate signature)
Spark 2 / AuthentiChip
Spark 2 and AuthentiChip products are based on ISO14443A RFID transponders which comply with NFC Type 4 (NfcA for Android, NFCTagTypeISO7816Compatible for iOS). They use a traditional APDU compliant command format so communicating with a CCID reader over PS/SC should be straightforward.
For this example, we will use a Spark 2 chip with a 7 byte UID of 04 29 38 22 2f 5c 80. The Spark 2 mutual authentication functions are tied to the standard NFC NDEF application ID (AID) for NFC Forum Type 4 transponders (D2 76 00 00 85 01 01 00), so we must start by selecting this AID using the standard select APDU command.
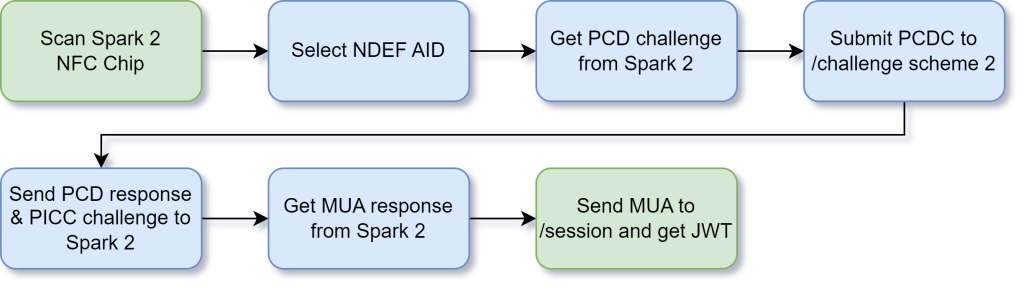
STEP 1. Select the NDEF AID
CLA: 00
INS: A4
P1: 04
P2: 0C
Lc: 07
Data: D2 76 00 00 85 01 01
Le: 00
Complete APDU: 00 A4 04 0C 07 D2 76 00 00 85 01 01 00
Receive: 90 00
You should receive no payload response, only status words SW1, SW1 with values of 90 00 which means "success".
STEP 2. Request PCD challenge
The Spark 2 begins mutual authentication by issuing a PCD challenge - a challenge issued to the Verify API to prove VivoKey has the same key the chip does. This must be sent to the /challenge endpoint to obtain a PICC challenge - a challenge to the Spark 2 to prove it has the same key VivoKey does.
CLA: 90
INS: 71
P1: 00
P2: 00
Lc: 02
Key: 02
Data: 00
Le: 00
Complete APDU: 90 71 00 00 02 02 00 00
Receive: 87 86 b1 2d 5e e7 14 de 5a 97 c5 c0 98 00 b6 68 91 af
The data received back should contain a 16 byte PCD challenge followed by two status words (SW1, SW2) with the values 91 AF which means "additional frame" expected. The Spark 2 is now expecting the next thing sent to it be a response to the PCD challenge along with a PICC challenge from the API.
STEP 3. Obtain a challenge from /challenge endpoint
For Spark 2, post a JSON object with a scheme value or 2, a message value of the 16 byte PCD challenge, and the UID of the Spark 2 to /challenge.
{"scheme": 2, "message":"8786b12d5ee714de5a97c5c09800b668", "uid":"042938222f5c80"}
You will receive a payload that contains the combined PCD response and PICC challenge, and an encrypted challenge token.
{"payload":"cebee779170430704d6f9b28e5a2cad5eff20ce410233b19e4a9ae64e030c10f","token":"eyJhbGciOiJkaXIiLCJlbmMiOiJBMjU2R0NNIn0..7E30dAWbIIDnmTAK.N6EIEvT2VshQZd30z7S1IjKavR5IvHHOVxnrYDaEnMxX1rhghXHcxbdjnHIr2sTaAaGJfq5s_6gosLnbrAMJmmZloBAcsPuuUztp6sket9s8ZijXy7npChU9XrlTW-0RMGNx2l5X8BMVL4yAP5varLD7lMMnFPHqrJ6XvNx4N0ehW4pTRg_VqpJ08HeTbgR42zjFV8V_yIUQP28Ia7SCDmIn6ot-5Rl0.mmnJMa-1iv37SHXI_sOtEw"}
STEP 4. Send PCD response and PICC challenge
The Spark 2 now wants a 16 byte response along with a 16 byte PICC challenge it will respond to.
CLA: 90
INS: AF
P1: 00
P2: 00
Lc: 20
Data: ce be e7 79 17 04 30 70 4d 6f 9b 28 e5 a2 ca d5 ef f2 0c e4 10 23 3b 19 e4 a9 ae 64 e0 30 c1 0f
Le: 00
Complete APDU: 90 AF 00 00 20 ce be e7 79 17 04 30 70 4d 6f 9b 28 e5 a2 ca d5 ef f2 0c e4 10 23 3b 19 e4 a9 ae 64 e0 30 c1 0f 00
Receive: b6 0b 6b 38 ad 5c 8e d6 f0 b4 27 85 90 ce 9f 63 85 62 92 47 05 c7 c6 3f 89 d5 3d 67 4c 99 04 19 91 00
The data received should contain a 32 byte response followed by two status words (SW1, SW2) with the values 91 00 which means "ok".
STEP 5. Submit the mutual auth response to the /session endpoint
The final step is to post the chip's UID, message response, and the original challenge token obtained in Step 2 from the /challenge endpoint to the /session endpoint.
{"uid":"042938222f5c80","response":"b60b6b38ad5c8ed6f0b4278590ce9f638562924705c7c63f89d53d674c990419","cld":"{\u0022data\u0022:\u0022testing\u0022}","token":"eyJhbGciOiJkaXIiLCJlbmMiOiJBMjU2R0NNIn0..7E30dAWbIIDnmTAK.N6EIEvT2VshQZd30z7S1IjKavR5IvHHOVxnrYDaEnMxX1rhghXHcxbdjnHIr2sTaAaGJfq5s_6gosLnbrAMJmmZloBAcsPuuUztp6sket9s8ZijXy7npChU9XrlTW-0RMGNx2l5X8BMVL4yAP5varLD7lMMnFPHqrJ6XvNx4N0ehW4pTRg_VqpJ08HeTbgR42zjFV8V_yIUQP28Ia7SCDmIn6ot-5Rl0.mmnJMa-1iv37SHXI_sOtEw"}
If successfully validated, you will receive a signed authenticity JWT in return which contains all the relevant information about the verified chip and the verification event.
{"token":"eyJ0eXAiOiJKV1QiLCJhbGciOiJFUzI1NiIsImtpZCI6ImprM3JXNEhBVm9HSzl6QVhsdnVzdnMxdTFLeVlMRUxYRG10OXlTOXViYUkifQ.eyJ0eXBlIjoyLCJwcm9kdWN0IjoyLCJhdHAiOiJtYXUiLCJjbGQiOiJ7XCJkYXRhXCI6XCJ0ZXN0aW5nXCJ9Iiwic3ViIjoiNjQ4ZmU2NThkYTdjNDg3NzkxZTg4ODc3NTE1M2Q3NjRmZWNlMzJmYjNkMTg5NWU1N2YxZDNjMzY5ZGFkYTk1MyIsImlhdCI6MTY4ODU4MzM4NSwiZXhwIjoxNjg4NTgzNDE1LCJpc3MiOiJodHRwczovL2F1dGgudml2b2tleS5jb20iLCJqdGkiOiIwZTgyYzFlZTllN2I4M2Q0Mzg1NWU2YjM4OGYxZmZiODI3OTE2MzQxNWJiNWU2NTMzODU4MDc4ZGY5YjM4ZTVhIn0.7xNJ6fSjf_CuawElJMZvnwvDF5VwBr6j4Wac2r2F7R0BoNydCXeQ72MUteZdwHDE6Z5_roh1sBrY-zs9pmQ-UA"}
Verify application for Apex
The Verify applet for Apex enables the Verify API to perform a challenge verification with the Apex. The Verify applet uses traditional APDU compliant command format so communicating with a CCID reader over PS/SC should be straightforward.
The Verify applet on Apex does not use the chip UID. Instead, the Verify applet is programmed with an 8 byte "Verify ID" that is returned as a result of selecting the Verify application. In this example, we will use ff 00 01 8d 2c 10 16 79 as the Verify ID. Start by selecting the Verify applet AID A000000846737061726B3201 using the standard select APDU command.
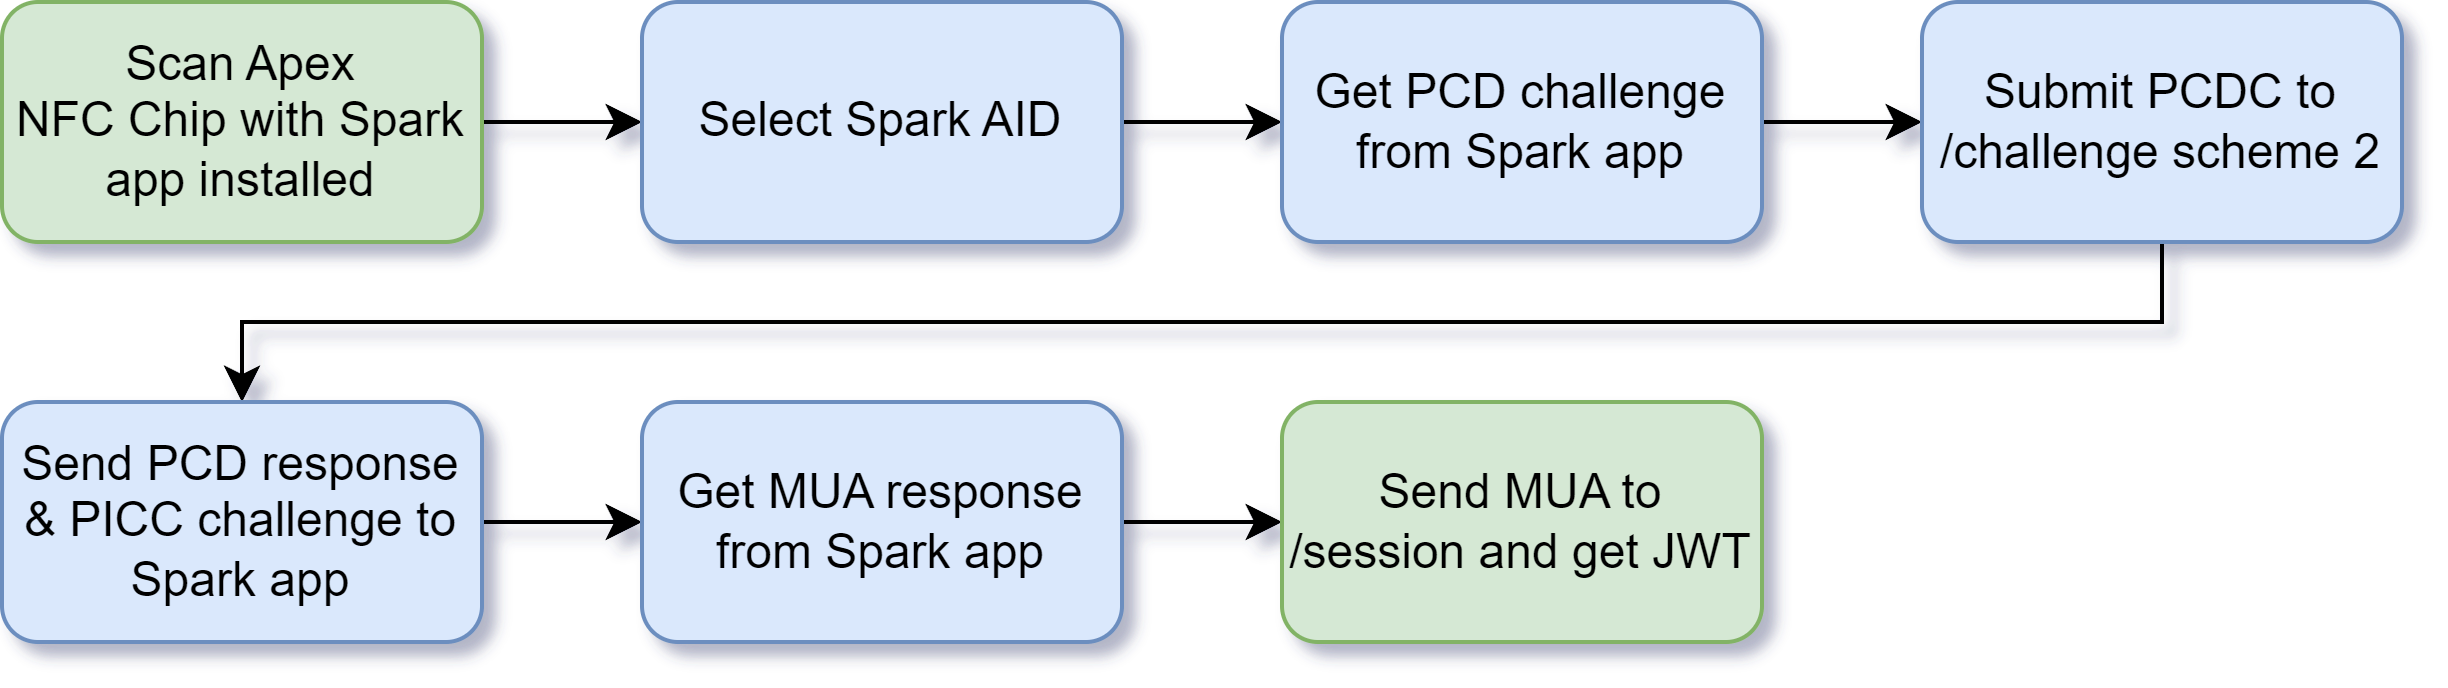
STEP 1. Select the Verify AID
CLA: 00
INS: A4
P1: 04
P2: 00
Lc: 0C
Data: A0 00 00 08 46 73 70 61 72 6B 32 01
Le: 00
Complete APDU: 00 A4 04 00 0C A0 00 00 08 46 73 70 61 72 6B 32 01 00
Receive: ff 0a 01 8d 2c 10 16 79 90 00
For this example, we will receive a payload response containing an 8 byte Verify ID (ff0a018d2c101679) followed by status words SW1, SW1 with values of 90 00 which means "success". You will need to use the Verify ID instead of the Apex chip's UID when interacting with the Verify API.
STEP 2. Request PCD challenge
The Spark applet begins mutual authentication by issuing a PCD challenge - a challenge to the API to prove we know the same key it does. This must be sent to the /challenge endpoint to obtain a PICC challenge - a challenge to the Spark applet to prove it knows the same key we do.
CLA: 90
INS: 71
P1: 00
P2: 00
Lc: 02
Key: 02
Data: 00
Le: 00
Complete APDU: 90 71 00 00 02 02 00 00
Receive: 87 86 b1 2d 5e e7 14 de 5a 97 c5 c0 98 00 b6 68 91 af
The data received back should contain a 16 byte PCD challenge followed by two status words (SW1, SW2) with the values 91 AF which means "additional frame" expected. This PCD challenge is what is sent to the /challenge endpoint to obtain a PICC challenge along with a PCD response. The Spark applet is now expecting the next thing sent to be a response to the PCD challenge along with a PICC challenge from the Verify API.
STEP 3. Obtain a challenge from /challenge endpoint
To obtain a challenge, post a JSON object with a scheme value or 2, a message value of the 16 byte PCD challenge, and the Verify ID (not the UID of the Apex) to /challenge.
{"scheme": 2, "message":"8786b12d5ee714de5a97c5c09800b668", "uid":"ff0a018d2c101679"}
You will receive a payload that contains the combined PCD response and PICC challenge, and an encrypted challenge token.
{"payload":"cebee779170430704d6f9b28e5a2cad5eff20ce410233b19e4a9ae64e030c10f","token":"eyJhbGciOiJkaXIiLCJlbmMiOiJBMjU2R0NNIn0..7E30dAWbIIDnmTAK.N6EIEvT2VshQZd30z7S1IjKavR5IvHHOVxnrYDaEnMxX1rhghXHcxbdjnHIr2sTaAaGJfq5s_6gosLnbrAMJmmZloBAcsPuuUztp6sket9s8ZijXy7npChU9XrlTW-0RMGNx2l5X8BMVL4yAP5varLD7lMMnFPHqrJ6XvNx4N0ehW4pTRg_VqpJ08HeTbgR42zjFV8V_yIUQP28Ia7SCDmIn6ot-5Rl0.mmnJMa-1iv37SHXI_sOtEw"}
STEP 4. Send PCD response and PICC challenge
The Verify applet is waiting for a 16 byte PCD response along with a 16 byte PICC challenge it will respond to.
CLA: 90
INS: AF
P1: 00
P2: 00
Lc: 20
Data: ce be e7 79 17 04 30 70 4d 6f 9b 28 e5 a2 ca d5 ef f2 0c e4 10 23 3b 19 e4 a9 ae 64 e0 30 c1 0f
Le: 00
Complete APDU: 90 AF 00 00 20 ce be e7 79 17 04 30 70 4d 6f 9b 28 e5 a2 ca d5 ef f2 0c e4 10 23 3b 19 e4 a9 ae 64 e0 30 c1 0f 00
Receive: b6 0b 6b 38 ad 5c 8e d6 f0 b4 27 85 90 ce 9f 63 85 62 92 47 05 c7 c6 3f 89 d5 3d 67 4c 99 04 19 91 00
The data received back should contain a 32 byte response followed by two status words (SW1, SW2) with the values 91 00 which means "ok".
STEP 5. Submit the mutual auth response to the /authenticate endpoint
The final step is to post the Verify ID, message response, and the original challenge token obtained in Step 2 from the /challenge endpoint to the /session endpoint.
{"uid":"ff0a018d2c101679","response":"b60b6b38ad5c8ed6f0b4278590ce9f638562924705c7c63f89d53d674c990419","cld":"{\u0022data\u0022:\u0022testing\u0022}","token":"eyJhbGciOiJkaXIiLCJlbmMiOiJBMjU2R0NNIn0..7E30dAWbIIDnmTAK.N6EIEvT2VshQZd30z7S1IjKavR5IvHHOVxnrYDaEnMxX1rhghXHcxbdjnHIr2sTaAaGJfq5s_6gosLnbrAMJmmZloBAcsPuuUztp6sket9s8ZijXy7npChU9XrlTW-0RMGNx2l5X8BMVL4yAP5varLD7lMMnFPHqrJ6XvNx4N0ehW4pTRg_VqpJ08HeTbgR42zjFV8V_yIUQP28Ia7SCDmIn6ot-5Rl0.mmnJMa-1iv37SHXI_sOtEw"}
If successfully authenticated, you will receive a JWE (encrypted JWT) in return which contains all the relevant information about the verified chip and the verification event. This JWE can safely be sent to your backend service for verification.
{"token":"eyJ0eXAiOiJKV1QiLCJhbGciOiJFUzI1NiIsImtpZCI6ImprM3JXNEhBVm9HSzl6QVhsdnVzdnMxdTFLeVlMRUxYRG10OXlTOXViYUkifQ.eyJ0eXBlIjoyLCJwcm9kdWN0IjoyLCJhdHAiOiJtYXUiLCJjbGQiOiJ7XCJkYXRhXCI6XCJ0ZXN0aW5nXCJ9Iiwic3ViIjoiNjQ4ZmU2NThkYTdjNDg3NzkxZTg4ODc3NTE1M2Q3NjRmZWNlMzJmYjNkMTg5NWU1N2YxZDNjMzY5ZGFkYTk1MyIsImlhdCI6MTY4ODU4MzM4NSwiZXhwIjoxNjg4NTgzNDE1LCJpc3MiOiJodHRwczovL2F1dGgudml2b2tleS5jb20iLCJqdGkiOiIwZTgyYzFlZTllN2I4M2Q0Mzg1NWU2YjM4OGYxZmZiODI3OTE2MzQxNWJiNWU2NTMzODU4MDc4ZGY5YjM4ZTVhIn0.7xNJ6fSjf_CuawElJMZvnwvDF5VwBr6j4Wac2r2F7R0BoNydCXeQ72MUteZdwHDE6Z5_roh1sBrY-zs9pmQ-UA"}
Appendix
Definitions
APDU = Application Protocol Data Unit. This is a specific schema which specifies the organization, security, and commands for interchange between the reader and ISO/IEC 7816-4 compliant chips. Wikipedia
PCD = Proximity Coupling Device. This is the RFID or NFC reader, also called an "interrogator". It is the device which provides the magnetic field for an RFID or NFC contactless card to induct power from and communicate over is called the PCD. The use of the term "proximity" is unfortunate because that term has been adopted by certain standards like ISO14443 as "proximity technologies", while the ISO15693 standard refers to itself as a "vicinity technology". However, the term VCD is not a widely used term, so for all intents and purposes, both "proximity" and "vicinity" technology standards refer to the reader device as a "PCD".
PICC = Proximity Integrated Circuit Card. This is the RFID chip, card, fob, etc. which the PCD powers and communicates with. The term "proximity" here specifically means a set of "proximity technologies" which includes ISO14443 standard contactless cards.
VICC = Vicinity Integrated Circuit Card. This is the RFID chip, card, fob, etc. which the PCD powers and communicates with. The term "proximity" here specifically means a set of "proximity technologies" which includes ISO15693 standard contactless cards.
SW1 , SW2 = Status Word 1, Status Word 2. When sending an APDU from a PCD to a PICC, responses may or may not contain response data, but they will almost always contain status words 1 and 2. These are codes which report the resulting status of the APDU which was sent. Status words of 90 and 00 together mean "Success", for example. These bytes will appear after any data which may have been returned from the card in response to the APDU request.
APDU Response Codes (SW1, SW2)
When working with PC/SC readers, APDU messages are used to exchange data between the application and both the transponder on the reader and the reader itself. Responses returned generally will contain a two "status word" byte suffix which gives clues as to the result of your request.
| SW1 | SW2 | (Info/Warning/Error/Security) Description |
|---|---|---|
| 6 | (E) Class not supported. | |
| 61 | — | (I) Response bytes still available |
| 61 | XX | (I) Command successfully executed; ‘XX’ bytes of data are available and can be requested using GET RESPONSE. |
| 62 | — | (W) State of non-volatile memory unchanged |
| 62 | 00 | (W) No information given (NV-Ram not changed) |
| 62 | 01 | (W) NV-Ram not changed 1. |
| 62 | 81 | (W) Part of returned data may be corrupted |
| 62 | 82 | (W) End of file/record reached before reading Le bytes |
| 62 | 83 | (W) Selected file invalidated |
| 62 | 84 | (W) Selected file is not valid. FCI not formated according to ISO |
| 62 | 85 | (W) No input data available from a sensor on the card. No Purse Engine enslaved for R3bc |
| 62 | A2 | (W) Wrong R-MAC |
| 62 | A4 | (W) Card locked (during reset( )) |
| 62 | CX | (W) Counter with value x (command dependent) |
| 62 | F1 | (W) Wrong C-MAC |
| 62 | F3 | (W) Internal reset |
| 62 | F5 | (W) Default agent locked |
| 62 | F7 | (W) Cardholder locked |
| 62 | F8 | (W) Basement is current agent |
| 62 | F9 | (W) CALC Key Set not unblocked |
| 62 | FX | (W) – |
| 62 | XX | (W) RFU |
| 63 | — | (W) State of non-volatile memory changed |
| 63 | 00 | (W) No information given (NV-Ram changed) |
| 63 | 81 | (W) File filled up by the last write. Loading/updating is not allowed. |
| 63 | 82 | (W) Card key not supported. |
| 63 | 83 | (W) Reader key not supported. |
| 63 | 84 | (W) Plaintext transmission not supported. |
| 63 | 85 | (W) Secured transmission not supported. |
| 63 | 86 | (W) Volatile memory is not available. |
| 63 | 87 | (W) Non-volatile memory is not available. |
| 63 | 88 | (W) Key number not valid. |
| 63 | 89 | (W) Key length is not correct. |
| 63 | C0 | (W) Verify fail, no try left. |
| 63 | C1 | (W) Verify fail, 1 try left. |
| 63 | C2 | (W) Verify fail, 2 tries left. |
| 63 | C3 | (W) Verify fail, 3 tries left. |
| 63 | CX | (W) The counter has reached the value ‘x’ (0 = x = 15) (command dependent). |
| 63 | F1 | (W) More data expected. |
| 63 | F2 | (W) More data expected and proactive command pending. |
| 63 | FX | (W) – |
| 63 | XX | (W) RFU |
| 64 | — | (E) State of non-volatile memory unchanged |
| 64 | 00 | (E) No information given (NV-Ram not changed) |
| 64 | 01 | (E) Command timeout. Immediate response required by the card. |
| 64 | XX | (E) RFU |
| 65 | — | (E) State of non-volatile memory changed |
| 65 | 00 | (E) No information given |
| 65 | 01 | (E) Write error. Memory failure. There have been problems in writing or reading the EEPROM. Other hardware problems may also bring this error. |
| 65 | 81 | (E) Memory failure |
| 65 | FX | (E) – |
| 65 | XX | (E) RFU |
| 66 | — | (S) |
| 66 | 00 | (S) Error while receiving (timeout) |
| 66 | 01 | (S) Error while receiving (character parity error) |
| 66 | 02 | (S) Wrong checksum |
| 66 | 03 | (S) The current DF file without FCI |
| 66 | 04 | (S) No SF or KF under the current DF |
| 66 | 69 | (S) Incorrect Encryption/Decryption Padding |
| 66 | XX | (S) – |
| 67 | — | (E) |
| 67 | 00 | (E) Wrong length |
| 67 | XX | (E) length incorrect (procedure)(ISO 7816-3) |
| 68 | — | (E) Functions in CLA not supported |
| 68 | 00 | (E) No information given (The request function is not supported by the card) |
| 68 | 81 | (E) Logical channel not supported |
| 68 | 82 | (E) Secure messaging not supported |
| 68 | 83 | (E) Last command of the chain expected |
| 68 | 84 | (E) Command chaining not supported |
| 68 | FX | (E) – |
| 68 | XX | (E) RFU |
| 69 | — | (E) Command not allowed |
| 69 | 00 | (E) No information given (Command not allowed) |
| 69 | 01 | (E) Command not accepted (inactive state) |
| 69 | 81 | (E) Command incompatible with file structure |
| 69 | 82 | (E) Security condition not satisfied. |
| 69 | 83 | (E) Authentication method blocked |
| 69 | 84 | (E) Referenced data reversibly blocked (invalidated) |
| 69 | 85 | (E) Conditions of use not satisfied. |
| 69 | 86 | (E) Command not allowed (no current EF) |
| 69 | 87 | (E) Expected secure messaging (SM) object missing |
| 69 | 88 | (E) Incorrect secure messaging (SM) data object |
| 69 | 8D | Reserved |
| 69 | 96 | (E) Data must be updated again |
| 69 | E1 | (E) POL1 of the currently Enabled Profile prevents this action. |
| 69 | F0 | (E) Permission Denied |
| 69 | F1 | (E) Permission Denied – Missing Privilege |
| 69 | FX | (E) – |
| 69 | XX | (E) RFU |
| 6A | — | (E) Wrong parameter(s) P1-P2 |
| 6A | 00 | (E) No information given (Bytes P1 and/or P2 are incorrect) |
| 6A | 80 | (E) The parameters in the data field are incorrect. |
| 6A | 81 | (E) Function not supported |
| 6A | 82 | (E) File not found |
| 6A | 83 | (E) Record not found |
| 6A | 84 | (E) There is insufficient memory space in record or file |
| 6A | 85 | (E) Lc inconsistent with TLV structure |
| 6A | 86 | (E) Incorrect P1 or P2 parameter. |
| 6A | 87 | (E) Lc inconsistent with P1-P2 |
| 6A | 88 | (E) Referenced data not found |
| 6A | 89 | (E) File already exists |
| 6A | 8A | (E) DF name already exists. |
| 6A | F0 | (E) Wrong parameter value |
| 6A | FX | (E) – |
| 6A | XX | (E) RFU |
| 6B | — | (E) |
| 6B | 00 | (E) Wrong parameter(s) P1-P2 |
| 6B | XX | (E) Reference incorrect (procedure byte), (ISO 7816-3) |
| 6C | — | (E) Wrong length Le |
| 6C | 00 | (E) Incorrect P3 length. |
| 6C | XX | (E) Bad length value in Le; ‘xx’ is the correct exact Le |
| 6D | — | (E) |
| 6D | 00 | (E) Instruction code not supported or invalid |
| 6D | XX | (E) Instruction code not programmed or invalid (procedure byte), (ISO 7816-3) |
| 6E | — | (E) |
| 6E | 00 | (E) Class not supported |
| 6E | XX | (E) Instruction class not supported (procedure byte), (ISO 7816-3) |
| 6F | — | (E) Internal exception |
| 6F | 00 | (E) Command aborted – more exact diagnosis not possible (e.g., operating system error). |
| 6F | FF | (E) Card dead (overuse, …) |
| 6F | XX | (E) No precise diagnosis (procedure byte), (ISO 7816-3) |
| 9- | — | |
| 90 | 00 | (I) Command successfully executed (OK). |
| 90 | 04 | (W) PIN not succesfully verified, 3 or more PIN tries left |
| 90 | 08 | Key/file not found |
| 90 | 80 | (W) Unblock Try Counter has reached zero |
| 91 | 00 | OK |
| 91 | 01 | States.activity, States.lock Status or States.lockable has wrong value |
| 91 | 02 | Transaction number reached its limit |
| 91 | 0C | No changes |
| 91 | 0E | Insufficient NV-Memory to complete command |
| 91 | 1C | Command code not supported |
| 91 | 1E | CRC or MAC does not match data |
| 91 | 40 | Invalid key number specified |
| 91 | 7E | Length of command string invalid |
| 91 | 9D | Not allow the requested command |
| 91 | 9E | Value of the parameter invalid |
| 91 | A0 | Requested AID not present on PICC |
| 91 | A1 | Unrecoverable error within application |
| 91 | AE | Authentication status does not allow the requested command |
| 91 | AF | Additional data frame is expected to be sent |
| 91 | BE | Out of boundary |
| 91 | C1 | Unrecoverable error within PICC |
| 91 | CA | Previous Command was not fully completed |
| 91 | CD | PICC was disabled by an unrecoverable error |
| 91 | CE | Number of Applications limited to 28 |
| 91 | DE | File or application already exists |
| 91 | EE | Could not complete NV-write operation due to loss of power |
| 91 | F0 | Specified file number does not exist |
| 91 | F1 | Unrecoverable error within file |
| 92 | 0x | (I) Writing to EEPROM successful after ‘x’ attempts. |
| 92 | 10 | (E) Insufficient memory. No more storage available. |
| 92 | 40 | (E) Writing to EEPROM not successful. |
| 93 | 01 | Integrity error |
| 93 | 02 | Candidate S2 invalid |
| 93 | 03 | (E) Application is permanently locked |
| 94 | 00 | (E) No EF selected. |
| 94 | 01 | Candidate currency code does not match purse currency |
| 94 | 02 | Candidate amount too high |
| 94 | 02 | (E) Address range exceeded. |
| 94 | 03 | Candidate amount too low |
| 94 | 04 | (E) FID not found, record not found or comparison pattern not found. |
| 94 | 05 | Problems in the data field |
| 94 | 06 | (E) Required MAC unavailable |
| 94 | 07 | Bad currency : purse engine has no slot with R3bc currency |
| 94 | 08 | R3bc currency not supported in purse engine |
| 94 | 08 | (E) Selected file type does not match command. |
| 95 | 80 | Bad sequence |
| 96 | 81 | Slave not found |
| 97 | 00 | PIN blocked and Unblock Try Counter is 1 or 2 |
| 97 | 02 | Main keys are blocked |
| 97 | 04 | PIN not succesfully verified, 3 or more PIN tries left |
| 97 | 84 | Base key |
| 97 | 85 | Limit exceeded – C-MAC key |
| 97 | 86 | SM error – Limit exceeded – R-MAC key |
| 97 | 87 | Limit exceeded – sequence counter |
| 97 | 88 | Limit exceeded – R-MAC length |
| 97 | 89 | Service not available |
| 98 | 02 | (E) No PIN defined. |
| 98 | 04 | (E) Access conditions not satisfied, authentication failed. |
| 98 | 35 | (E) ASK RANDOM or GIVE RANDOM not executed. |
| 98 | 40 | (E) PIN verification not successful. |
| 98 | 50 | (E) INCREASE or DECREASE could not be executed because a limit has been reached. |
| 98 | 62 | (E) Authentication Error, application specific (incorrect MAC) |
| 99 | 00 | 1 PIN try left |
| 99 | 04 | PIN not succesfully verified, 1 PIN try left |
| 99 | 85 | Wrong status – Cardholder lock |
| 99 | 86 | (E) Missing privilege |
| 99 | 87 | PIN is not installed |
| 99 | 88 | Wrong status – R-MAC state |
| 9A | 00 | 2 PIN try left |
| 9A | 04 | PIN not succesfully verified, 2 PIN try left |
| 9A | 71 | Wrong parameter value – Double agent AID |
| 9A | 72 | Wrong parameter value – Double agent Type |
| 9D | 05 | (E) Incorrect certificate type |
| 9D | 07 | (E) Incorrect session data size |
| 9D | 08 | (E) Incorrect DIR file record size |
| 9D | 09 | (E) Incorrect FCI record size |
| 9D | 0A | (E) Incorrect code size |
| 9D | 10 | (E) Insufficient memory to load application |
| 9D | 11 | (E) Invalid AID |
| 9D | 12 | (E) Duplicate AID |
| 9D | 13 | (E) Application previously loaded |
| 9D | 14 | (E) Application history list full |
| 9D | 15 | (E) Application not open |
| 9D | 17 | (E) Invalid offset |
| 9D | 18 | (E) Application already loaded |
| 9D | 19 | (E) Invalid certificate |
| 9D | 1A | (E) Invalid signature |
| 9D | 1B | (E) Invalid KTU |
| 9D | 1D | (E) MSM controls not set |
| 9D | 1E | (E) Application signature does not exist |
| 9D | 1F | (E) KTU does not exist |
| 9D | 20 | (E) Application not loaded |
| 9D | 21 | (E) Invalid Open command data length |
| 9D | 30 | (E) Check data parameter is incorrect (invalid start address) |
| 9D | 31 | (E) Check data parameter is incorrect (invalid length) |
| 9D | 32 | (E) Check data parameter is incorrect (illegal memory check area) |
| 9D | 40 | (E) Invalid MSM Controls ciphertext |
| 9D | 41 | (E) MSM controls already set |
| 9D | 42 | (E) Set MSM Controls data length less than 2 bytes |
| 9D | 43 | (E) Invalid MSM Controls data length |
| 9D | 44 | (E) Excess MSM Controls ciphertext |
| 9D | 45 | (E) Verification of MSM Controls data failed |
| 9D | 50 | (E) Invalid MCD Issuer production ID |
| 9D | 51 | (E) Invalid MCD Issuer ID |
| 9D | 52 | (E) Invalid set MSM controls data date |
| 9D | 53 | (E) Invalid MCD number |
| 9D | 54 | (E) Reserved field error |
| 9D | 55 | (E) Reserved field error |
| 9D | 56 | (E) Reserved field error |
| 9D | 57 | (E) Reserved field error |
| 9D | 60 | (E) MAC verification failed |
| 9D | 61 | (E) Maximum number of unblocks reached |
| 9D | 62 | (E) Card was not blocked |
| 9D | 63 | (E) Crypto functions not available |
| 9D | 64 | (E) No application loaded |
| 9E | 00 | PIN not installed |
| 9E | 04 | PIN not succesfully verified, PIN not installed |
| 9F | 00 | PIN blocked and Unblock Try Counter is 3 |
| 9F | 04 | PIN not succesfully verified, PIN blocked and Unblock Try Counter is 3 |
| 9F | XX | Command successfully executed; ‘xx’ bytes of data are available and can be requested using GET RESPONSE. |
| 9x | XX | Application related status, (ISO 7816-3) |
VivoKey API License Agreement and Terms of Use
Effective Date: May 5th, 2025
By accessing or using the VivoKey Verify API, you agree to the following terms and conditions. If you do not agree with these terms, you must not use the VivoKey Verify API.
API Description and Purpose
The VivoKey API provides cryptographic verification services for VivoKey programmed NFC transponders, allowing you to verify the authenticity of a VivoKey programmed NFC device. This API is designed exclusively as a proof-of-authenticity service. It does not handle or transmit any personal identifiable information (PII), user passwords, account data, or other sensitive personal information. You should not provide any such data to the API. The API’s sole function is to confirm authenticity of VivoKey products, and it returns non-personal cryptographic authenticity tokens.
License Grant
VivoKey hereby grants you a limited, non-exclusive, non-transferable, non-sublicensable, revocable license to access and use the VivoKey API free of charge, solely for the purpose of verifying VivoKey transponder authenticity within your own applications or services. This license permits integration of the API into your own software, applications, or services (whether commercial or non-commercial), provided that you comply with all terms set forth in this Agreement. All rights not expressly granted are reserved by VivoKey. No ownership rights in the API or any VivoKey intellectual property are transferred to you by this Agreement.
Acceptable Use and Restrictions
You agree to use the VivoKey API only for lawful, intended purposes and in accordance with this Agreement. Integration: You may incorporate the API into your products or applications to enable authenticity verification of VivoKey devices for end-users. Attribution: You may publicly reference that your application uses the VivoKey API for authenticity verification, but you must not misrepresent the API or your association with VivoKey.
Prohibited Uses
You must not:
Unlawful or Unauthorized Purposes: Use the API for any purpose that is unlawful, illegal, fraudulent, or unauthorized. This includes any use that violates applicable laws or regulations, or that infringes the rights of any third party.
Repackaging or Reselling: Repackage, redistribute, or provide the API or its responses as a stand-alone product or service. You may not use the VivoKey Verify API to create a competing or substitute service, or operate a proxy that calls the VivoKey Verify API while claiming to offer authenticity verification independently of VivoKey. In other words, you must not sell, lease, or sublicense the API to others, or charge others for its use, except as integrated into your own application’s functionality.
Submission of Sensitive Data: Send or transmit to the API any personal data, such as names, birthdates, addresses, phone numbers, email addresses, passwords, account credentials, financial information, or other PII. The API is not intended to handle such data, and you agree not to misuse it by attempting to input or retrieve any personal or confidential information.
Malicious Activity: Use the API in any manner that could damage, disable, overburden, or impair the API or the underlying systems, or interfere with anyone else’s use of the API. You must not attempt to circumvent any security measures, authentication measures, or usage limits (if any) of the API. You must not introduce any malware, virus, harmful code, or perform any attack (such as a denial-of-service attack) on the API or VivoKey’s servers.
Reverse Engineering: Attempt to reverse engineer, decipher, decompile, disassemble, or otherwise attempt to extract the source code, underlying algorithms, or proprietary aspects of the API or any related VivoKey service. You also shall not remove or obscure any copyright, trademark, or other proprietary notices on any outputs or materials obtained via the API.
Misrepresentation and Fraud: Falsify or misrepresent data or responses from the API as if they originated from a source other than VivoKey. You may not use the API in a deceptive or misleading way, such as falsifying authenticity results or implying VivoKey’s endorsement of any unauthorized use.
VivoKey reserves the right to monitor your use of the API to ensure compliance with these terms. If VivoKey (in its sole discretion) determines that you have violated any of the above usage restrictions or otherwise misused the API, VivoKey may suspend or terminate your access to the API without notice (see Termination below).
Disclaimer of Warranties
The VivoKey Verify API is provided “AS IS” and “AS AVAILABLE”, without any warranty of any kind. VivoKey disclaims all warranties and conditions, express, implied, or statutory, including but not limited to implied warranties of merchantability, fitness for a particular purpose, title, non-infringement, and any warranties that the API’s operation or results will be accurate, correct, or reliable.
No Guarantee of Availability or Accuracy: VivoKey does not guarantee that the API will be available at any given time or uninterrupted, that it will meet your requirements, or that it will operate error-free or free of defects. Any authenticity verification or information provided by the API is not guaranteed to be accurate or complete, and VivoKey assumes no responsibility for any errors or omissions. VivoKey provides no uptime or availability warranty – the API may be subject to occasional outages, interruptions, or errors beyond VivoKey’s control.
You expressly acknowledge that use of the API is at your sole risk. You assume full responsibility for the results obtained from the API and any conclusions drawn from such results. VivoKey makes no warranty that the API will detect all instances of inauthentic devices or prevent fraud. All risk as to the quality and performance of the API lies with you.
Limitation of Liability
To the maximum extent permitted by applicable law, in no event will VivoKey or its affiliates, subsidiaries, officers, employees, or partners be liable to you or any third party for any indirect, incidental, consequential, special, exemplary, or punitive damages whatsoever arising out of or relating to your use of (or inability to use) the VivoKey API or the results it provides. This exclusion of liability includes, without limitation, any damages for lost profits or revenues, lost savings or business opportunities, loss or corruption of data, business interruption, or any other commercial or economic losses, even if VivoKey has been advised of the possibility of such damages.
VivoKey shall not be liable for any damages or claims arising from: (a) API downtime or unavailability, or the failure of the API to operate as anticipated; (b) your use of or reliance on any output, verification result, or information provided by the API; or (c) any unauthorized access to or alteration of your transmissions or data (except to the extent caused solely by VivoKey’s willful misconduct).
If, notwithstanding the above disclaimers, VivoKey is found liable for any claim or cause of action arising out of the API or these terms, VivoKey’s total cumulative liability to you (for all claims combined) shall not exceed the amount you have paid VivoKey for use of the API (if any) in the twelve (12) months immediately preceding the claim, or US $100, whichever is greater. In many cases, this will be zero, as the API is provided free of charge. This limitation applies regardless of the form of action (whether in contract, tort, negligence, strict liability, or otherwise) and will remain enforceable even if any remedy fails of its essential purpose.
Some jurisdictions do not allow the exclusion or limitation of certain warranties or liabilities (for example, limiting liability for personal injury or for gross negligence, or excluding implied warranties). To the extent such a law applies to you, some of the above exclusions or limitations may not apply, but only to the minimum extent required by that law. In such cases, VivoKey’s liability will be limited to the fullest extent permitted by applicable law.
Indemnification
You agree to indemnify, defend, and hold harmless VivoKey and its parent companies, subsidiaries, affiliates, officers, directors, employees, agents, and partners from and against any and all claims, losses, liabilities, damages, expenses, and costs (including reasonable attorneys’ fees and court costs) arising out of or related to your use of the VivoKey API, your violation of these terms, or your violation of any law or the rights of any third party in connection with your use of the API.
This indemnification obligation includes, but is not limited to, any claims or demands arising from:
API Use or Results: Your integration of or use of the API (including any data or results obtained through the API), such as any claim that the API was used inappropriately in your application or that authenticity verification results provided by you (via the API) were inaccurate, misleading, or caused harm.
API Unavailability or Errors: Any harm, loss, or damage claimed by you or a third party due to the API being unavailable, interrupted, having errors, or otherwise not performing as expected.
Breach or Misconduct: Your breach of this Agreement or misconduct, including any use of the API that is not in compliance with the Acceptable Use restrictions, or any allegation that your use of the API is unlawful or infringes on the intellectual property or privacy rights of someone else.
You agree to promptly notify VivoKey of any such claims and to cooperate fully with VivoKey in defending against them. VivoKey reserves the right, at its own expense, to assume the exclusive defense and control of any matter otherwise subject to indemnification by you (in which event you will cooperate with VivoKey and provide any information or assistance reasonably requested). You shall not settle any claim involving the API or VivoKey without VivoKey’s prior written consent, unless such settlement completely and unconditionally releases VivoKey from all liability.
Termination
This Agreement will remain in effect so long as you use or access the VivoKey Verify API. You may terminate this Agreement at any time by ceasing all use of the API and deleting any API keys, credentials, or documentation in your possession.
VivoKey reserves the right to terminate this Agreement or suspend/terminate your access to the API (in whole or in part) at any time, for any reason or no reason, at its sole discretion. In particular, if you violate any of these terms or misuse the API, your right to use the API may be suspended or revoked without notice. VivoKey may also discontinue the API or any portion or feature thereof at any time for any reason.
Upon any termination of this Agreement or suspension of API access, you must immediately stop using the API. Sections of this Agreement that by their nature should survive termination (including but not limited to Disclaimer of Warranties, Limitation of Liability, Indemnification, Governing Law, and Miscellaneous provisions) shall survive any termination or expiration of this Agreement, and will remain in effect to govern any continued or past use of the API.
Governing Law and Jurisdiction
This Agreement and any dispute arising out of or relating to the VivoKey API or these terms shall be governed by the laws of the State of Washington, USA, without regard to its conflict of law principles. These terms are deemed to be entered into and performed in the State of Washington.
You agree that any legal action or proceeding arising under or relating to this Agreement or your use of the API shall be brought exclusively in the state or federal courts located in King County, Washington (which includes Seattle, Washington). You and VivoKey each consent to the personal and exclusive jurisdiction of such courts. You also waive any objections or defenses to venue in these courts based on inconvenience or any other grounds to the fullest extent allowed by law.
If you are accessing or using the API from outside the United States, you are still responsible for complying with all local laws and regulations, and you agree that United States (and Washington State) law will apply to any disputes (to the extent not prohibited by local law).
Modifications to Terms and API
Modifications to Terms: VivoKey reserves the right to modify or update these terms at any time. If we make material changes, we will post the revised terms on the VivoKey API documentation page (and/or notify you via the API or associated developer contact information, if available). Your continued use of the API after any updated Terms have been posted constitutes your acceptance of the changes. It is your responsibility to review the API terms periodically for updates. If you do not agree to the modified terms, you must stop using the API.
Changes to API: VivoKey may add, modify, or discontinue features of the API at any time, and may release subsequent versions or require you to use updated versions. VivoKey may also impose certain restrictions or limitations on API usage (such as rate limiting or access controls) to ensure stability and availability. We will endeavor to provide advance notice of any significant changes or deprecation of the API, but we are not obligated to do so. VivoKey shall not be liable for any damage or losses resulting from modifications, suspension, or discontinuation of the API or any of its features.
Miscellaneous
Entire Agreement: This License Agreement and Terms of Use constitutes the entire agreement between you and VivoKey regarding the use of the VivoKey API. It supersedes any prior or contemporaneous agreements, communications, or understandings (whether oral or written) relating to the API. No oral or written information or advice given by VivoKey, its representatives, or any third party shall create any warranty or obligation not expressly stated in these terms.
Severability: If any provision of this Agreement is held to be invalid, illegal, or unenforceable by a court of competent jurisdiction, that provision shall be enforced to the maximum extent permissible, and the remaining provisions of this Agreement will remain in full force and effect. The parties agree to negotiate in good faith a valid, enforceable substitute provision that most nearly effects the original intent of the unenforceable provision.
No Waiver: No failure or delay by VivoKey in exercising any right, power, or remedy under these terms shall operate as a waiver of any such right or provision. Any waiver of terms by VivoKey must be in writing to be effective, and shall not imply a waiver of any other or subsequent term.
Assignment: You may not assign or transfer any rights or obligations under this Agreement to any other person or entity without VivoKey’s prior written consent. Any attempted assignment in violation of this provision is null and void. VivoKey may assign or transfer this Agreement (in whole or in part) at its discretion, including to an affiliate or in connection with a merger, acquisition, or sale of assets.
Relationship: Nothing in this Agreement shall be construed as creating any partnership, joint venture, or agency relationship between you and VivoKey. You and VivoKey are independent contracting parties. You do not have any authority to assume or create any obligation for or on behalf of VivoKey.
Headings: The section titles and headings in this Agreement are for convenience only and have no legal or contractual effect.
By using the VivoKey API, you acknowledge that you have read, understood, and agree to these License Agreement and Terms of Use. If you have any questions about these terms, please contact VivoKey through the official support channels. Using the API in any manner indicates your acceptance of this Agreement. If you do not agree to these terms, you are not permitted to use the VivoKey API.